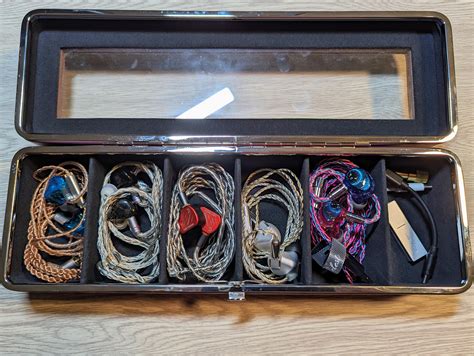
When you invest in a Custom Iem Box Iem Organizer, the biggest pitfall is neglecting the internal layout during setup. This oversight can leave your IEMs, tips, and cables shifting around, leading to tangles, damaged nozzles, and slower access when you need your gear. By focusing on a thoughtful arrangement from the start, you can protect delicate components, extend the life of your accessories, and keep everything you own neatly in reach. This article breaks down the mistake, explains why it happens, and offers practical strategies to avoid it for a safer, more organized setup.
Key Points
- Plan a dedicated compartment layout that keeps IEMs, tips, and cables separate to prevent rubbing and crowding.
- Choose inserts and materials that cushion delicate parts and resist moisture or static buildup.
- Design cable routing that minimizes bending, tangling, and stress on connectors.
- Label zones for quick access and consistent retrieval of items during travel or daily use.
- Schedule periodic checks to refresh inserts and re-optimize the layout as your gear changes.
Why this mistake happens
The most common reason people stumble with a Custom Iem Box Iem Organizer is focusing on exterior dimensions without mapping the inside. Without intentional compartments, items shift, tips rub against drivers, and cables end up knotting themselves in the bottom. This not only adversely affects performance but also makes routine tasks feel time-consuming. A little upfront planning goes a long way toward preventing damage and saving time in the long run.
How to avoid it
Start with a simple layout plan that designates space for each item: IEM shells, ear tips, cleaning tools, and spare cables. Use soft inserts or foam to cradle each piece, and reserve a dedicated pocket for the most fragile components. Keep frequently used items toward the front for quick access, while rarer tools can sit toward the back. Regularly reassess the arrangement—what works for one set of IEMs might need adjustment as your kit evolves.
Materials and layout tips
Opt for inserts made from memory foam, low-density EVA, or anti-static foam to shield sensitive drivers and cables. Avoid hard plastics that can press against delicate surfaces. For cables, create a gentle loop or short channel that prevents sharp bends, and use a small strap or wrap to keep each cable in its own nub. Label sections with durable tags or embossing so you can locate items without rummaging.
Maintenance and upkeep
Establish a quick routine: wipe dust, check for compressions in foam inserts, and replace worn sections before they fail to hold items securely. A well-maintained organizer reduces micro-movements during transit and helps preserve the acoustic seal and build quality of your IEMs.
What is the biggest sign you’ve picked the wrong internal layout for a Custom Iem Box Iem Organizer?
+The most obvious sign is persistent movement or rubbing noises once you carry the box, which indicates items aren’t held securely. If you find yourself reorganizing after every travel, it’s a good cue to redesign the compartments with more snug inserts and better cable routing.
How can I protect delicate IEM tips inside the organizer?
+Use soft, molded inserts or foam pockets that cradle each tip without compressing or bending them. Keep tips in their own labeled pockets and avoid stacking; this minimizes deformation and keeps seals fresh for longer.
Are there any smart materials I should consider for a Custom Iem Box Iem Organizer?
+Yes—look for anti-static foams to prevent buildup that could affect sensitive drivers, moisture-resistant fabrics or foams to guard against humidity, and memory foam inserts that hold their shape after travel. These choices help preserve sound quality and extend the life of the components.
How often should I revisit the layout of my organizer?
+Review the layout whenever you add or remove gear, after long trips, or if you notice any new wear patterns. A quick reorganization every few months can prevent accumulating stress points and keep access effortless.